Battery switch on travel trailer function is crucial for managing your RV’s power. Understanding how your battery switch works is key to preventing dead batteries and ensuring a smooth camping experience. This guide breaks down everything you need to know, from the different types of switches available to troubleshooting common problems and performing basic maintenance.
We’ll cover the various types of switches – single-pole, double-pole, and double-pole double-throw – explaining their pros and cons, installation, and how they interact with other systems like solar panels. We’ll also walk you through diagnosing issues, and show you how to keep your battery switch in top condition. Get ready to become a battery switch expert!
Types of Battery Switches in Travel Trailers
Choosing the right battery switch for your travel trailer is crucial for managing your power system effectively and safely. Different switches offer varying levels of control and complexity, each with its own set of pros and cons. Understanding these differences will help you make an informed decision based on your needs and technical skills.
So, you’re an audiophile who travels? Awesome! Check out this guide on audiophile travel setups to make sure your listening experience doesn’t suffer on the road. It’s crucial to protect your precious gear, and while you’re at it, don’t forget travel insurance! Getting Aon travel insurance might seem like a chore, but it’s a smart move to safeguard your trip and your investments – especially those expensive headphones!
Battery Switch Types and Their Characteristics
Travel trailers commonly utilize a few key types of battery switches: single-pole, double-pole, and double-pole double-throw (DPDT). Each type offers a different level of control over your battery bank, influencing both convenience and safety.
So, you’re an audiophile who travels? Awesome! Check out this guide on creating the perfect audiophile travel setup to keep your ears happy on the go. It’s all about packing smart and prioritizing sound quality. And while you’re planning your trip, don’t forget travel insurance! Getting Aon travel insurance is a must to protect your gear and yourself from unexpected mishaps.
Peace of mind is priceless, especially when you’re carrying expensive audio equipment.
| Switch Type | Description | Advantages | Disadvantages |
|---|---|---|---|
| Single-Pole | Controls the flow of electricity to a single circuit or battery. Think of it as an on/off switch for one battery. | Simple, inexpensive, easy to install. | Limited control; only allows for one battery to be connected at a time. Doesn’t offer isolation between batteries or the charging system. |
| Double-Pole | Controls the flow of electricity to both positive and negative terminals simultaneously, often used to isolate a battery bank from the trailer’s electrical system. | Provides better isolation, improving safety during maintenance or repairs. Allows for complete disconnect of the battery bank. | More complex than a single-pole switch, slightly more expensive, and requires more wiring. |
| Double-Pole Double-Throw (DPDT) | Allows switching between two sources of power (e.g., shore power and batteries) or between two battery banks. This is a more sophisticated switch offering multiple configurations. | Offers the most control and flexibility, allowing for easy switching between different power sources. Provides better power management capabilities. | Most complex to install, most expensive, and requires a higher level of electrical knowledge. |
Comparison of Battery Switch Features, Cost, and Installation Complexity
The table below summarizes the key differences between the three types of battery switches, considering factors relevant to a typical travel trailer installation. Note that prices are estimates and can vary depending on brand and retailer.
| Switch Type | Typical Cost (USD) | Installation Complexity | Features |
|---|---|---|---|
| Single-Pole | $10 – $30 | Low | Simple on/off control of one circuit. |
| Double-Pole | $20 – $50 | Medium | Complete isolation of a battery bank; safer for maintenance. |
| Double-Pole Double-Throw (DPDT) | $40 – $100+ | High | Switching between multiple power sources or battery banks; improved power management. |
Wiring and Installation Procedures: Battery Switch On Travel Trailer Function

Installing a battery switch in your travel trailer is a moderately challenging DIY project that significantly improves your RV’s electrical system. It allows you to isolate batteries, preventing accidental drain and improving safety. Proper wiring and careful attention to safety are crucial for a successful and safe installation.
This section provides a step-by-step guide, a wiring diagram, and important safety considerations for installing a battery switch in your travel trailer. Remember, if you’re not comfortable working with electricity, it’s best to consult a qualified RV technician.
Step-by-Step Installation Guide
The following steps Artikel the installation process. Remember to always disconnect the negative battery terminal before starting any electrical work. This prevents accidental short circuits and protects you from electrical shock.
- Gather Your Materials: This includes your chosen battery switch, appropriately sized wiring (gauge will depend on your battery’s amperage – consult an ampacity chart), fuses (again, appropriately sized), wire connectors, a suitable mounting location for the switch, and basic hand tools (screwdrivers, wire strippers, crimpers).
- Choose Your Mounting Location: Select a location that’s easily accessible, well-ventilated, and protected from the elements. A common spot is near the battery compartment.
- Run the Wiring: Carefully route the positive (+) and negative (-) wires from your battery to the switch, and from the switch to your load (e.g., the trailer’s electrical system). Secure the wiring using cable ties or clamps to prevent damage and maintain a neat installation.
- Connect the Wiring to the Switch: Connect the wires to the appropriate terminals on the battery switch according to the manufacturer’s instructions and the wiring diagram below. Ensure all connections are secure and properly crimped.
- Install Fuses: Install in-line fuses on both the positive (+) wire leading from the battery to the switch, and on any circuit that branches from the switch to your trailer’s electrical system. This protects your wiring and equipment from overcurrent.
- Mount the Switch: Securely mount the battery switch in its chosen location using appropriate screws or fasteners.
- Test the System: Reconnect the negative battery terminal. Carefully test the switch to ensure it operates correctly and that all circuits are functioning as expected. Verify that the fuses are not blowing.
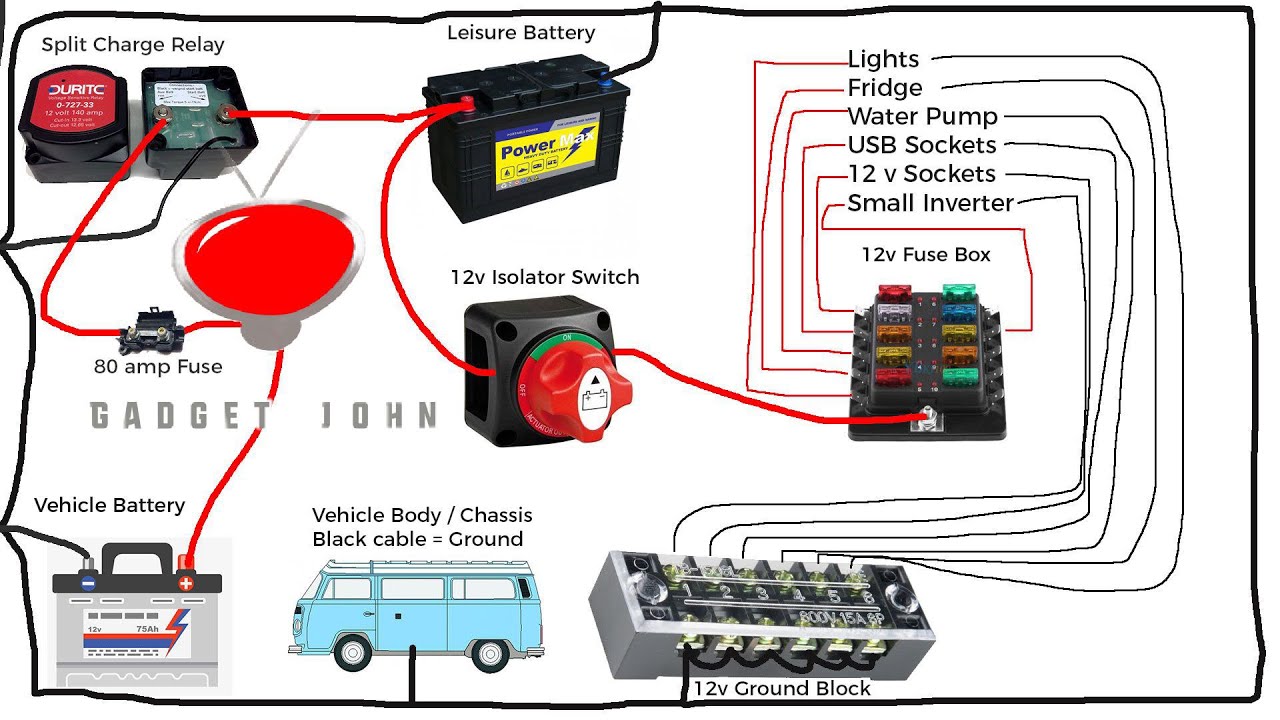
Wiring Diagram, Battery switch on travel trailer function
The following diagram illustrates a typical wiring configuration for a battery switch in a travel trailer. This is a simplified example; your specific setup may vary depending on your trailer’s electrical system and the type of battery switch you’re using.
Imagine a rectangle representing the battery switch. On the left side, you have two terminals, one labeled “+” (positive) and the other labeled “-” (negative). The positive terminal has a wire running from the positive terminal of the battery, passing through an in-line fuse, and then connecting to the “+” terminal on the switch. Another wire extends from the “+” terminal on the switch to the main power distribution point of the trailer, also passing through an in-line fuse.
The negative terminal on the switch has a wire running directly to the negative terminal of the battery. This setup allows you to isolate the battery from the trailer’s electrical system by switching off the switch. Always consult the specific instructions provided with your battery switch and refer to your trailer’s wiring diagram if available.
Importance of Appropriate Wiring and Fuses
Using appropriately sized wiring and fuses is paramount for safety and preventing damage to your electrical system. Undersized wiring can overheat and cause fires, while incorrect fuse ratings can lead to blown fuses or damage to equipment. Always consult an ampacity chart to determine the correct wire gauge and fuse rating based on the amperage draw of your battery and appliances.
For example, a 100-amp battery might require significantly thicker gauge wiring than a 50-amp battery.
Safety Precautions
Safety should be your top priority during any electrical work. Failing to observe proper safety measures can lead to serious injury or damage. Here are some essential safety precautions:
- Always disconnect the negative battery terminal before starting any work.
- Wear appropriate safety glasses to protect your eyes from sparks or debris.
- Use insulated tools to prevent electrical shock.
- Ensure proper ventilation to prevent the buildup of potentially explosive gases.
- Never work on electrical systems when wet or in damp conditions.
- If you are unsure about any aspect of the installation, consult a qualified electrician or RV technician.
Mastering your travel trailer’s battery switch is a game-changer for preventing frustrating power outages and maximizing your off-grid adventures. By understanding its function, performing regular maintenance, and knowing how to troubleshoot problems, you’ll ensure your RV’s electrical system runs smoothly for years to come. So, grab your tools, consult this guide, and confidently power your next camping trip!
Query Resolution
What happens if my battery switch is left in the “off” position?
Leaving the switch off completely disconnects your house batteries from the charging source and any appliances. This prevents drain but means you won’t have power to anything hooked to the house batteries.
How often should I clean my battery switch?
Inspect your battery switch every few months for corrosion and clean it with a wire brush and baking soda solution as needed.
Can I use a battery switch with a lithium battery system?
Yes, but you’ll want to choose a battery switch rated for the higher voltage and amperage of lithium batteries. Consult your battery manufacturer’s recommendations.
My battery switch is hot to the touch. What should I do?
A hot battery switch is a sign of high current draw or a loose connection. Turn off the switch immediately, inspect wiring, and consult a professional if the problem persists.
